First Step: Getting started
The very first thing you need to do is click file and then new. Depending on how long your name is, you will need to make a long landscape image. 600 by 150 pixels was fine for me.
It should look like this, with a canvas and automatically created a background layer.
Make a new layer, it's the button that looks like a turning page under the layers section. All your layers should be transparent except your Background. ALWAYS CREATE A NEW LAYER AFTER MAKING A CHANGE TO THE IMAGE!!! This way so that if you mess up, you don't have to start all over.
Optional: Rename it something else by double clicking it. This is not necessary, but it can keep your layers identified which one is which.
Step Two: The Text
Type your name on that layer with the type tool (Horizontal Type Tool).
The layer should be a text layer, but we need it to be paint-like. Right click on the layer and rasterize it.
Now create a new layer, except this one needs to be just like the previous one. So instead of clicking the new layer button, duplicate the layer.
A window will pop up. It just says what size the layer is, what you want to name it and such. Keep everything the same, and just click Okay.
Step Three: Work on the Text
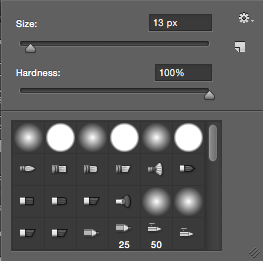
Now, here is the fun part, although is is quite tedious. You will slowly erase it backwards, bit by bit. Select the eraser tool. NOT THE MAGIC ERASER TOOL. That makes your entire name disappear. Trust me, I learned that the hard way.
Make sure the hardness is at 100%
Since "n" is the last letter of my name, I will erase a little bit off the end. Work backwards, so when you animate it, it will look like handwriting.
Done with the last name.
Finally, when your name is completely gone, it's time to start the animation. This part will be short and easy.
Step Four: Animating
You may already have a timeline out. If you don't, get it there. Go to window and check timeline.
It should appear at the bottom of your interface. The button should either read create frame animation or create video timeline. Choose frame animation, and click it.
There is a little tiny menu button on the top right corner of the timeline. You might be able to see it in the top picture, but here is a close up.
That menu is pretty much all we use to animate it. Click it, and make your layers into frames.
Remember: Your layers were transparent. You still have that plain white background layer, right? Good, now we use it. Shift click and select all your frames.
Look to your layers menu, and click the eye on the background layer. If it is already brightened, click it twice.
If you play your animation though, it will be written backwards. We need it to look like handwriting though, so you must flip the frames.
I already did that when I took the screenshot, but it will be brightened. Click it.
Now your animation is complete. (Yay!) But you still need to export it. I'm going to export as a gif. Go to the file window, and click Save for Web.
You should get this window.
Make sure it's a GIF 128 No Dither. Everything looks good, click Save. If you choose done, it'll just save your settings.
Yay! NOW you are fully done. Play your Gif, post it on the internet, show it to friends. Do what ever you want with it.


No comments:
Post a Comment